From BotFather to 'Hello World'
Great news, everybody: a few days ago, Telegram team updated their Bot API documentation! Among other things, they now have an end-to-end tutorial on the bot creation process: starting from bot registration in @BotFather, going all the way to database & deployment options.
Unfortunately, it features Java, Maven, and rubenlagus/TelegramBots library.
So, I’ve decided to copycat it, upgrading the examples to Kotlin, Gradle, and InsanusMokrassar/TelegramBotAPI! Read my version below 👇🏼
|
Important
|
Parts of the text below are shamelessly copy-pasted from the original tutorial. But don’t be tough on me: I respect copyright and authorship and in this case, I’m appealing for the fair use doctrine, which, I believe, this article would fall into. |
This guide will walk you through everything you need to know to build your first Telegram Bot.
If you already know your way around some of the basic steps, you can jump directly to the part you’re missing. Equivalent examples are available in C#, Python, Go, and TypeScript.
Introduction
At its core, you can think of the Telegram Bot API as software that provides JSON-encoded responses to your queries.
A bot, on the other hand, is essentially a routine, software or script that queries the API by means of an HTTPS request and waits for a response. There are several types of requests you can make, as well as many different objects that you can use and receive as responses.
Since your browser is capable of sending HTTPS requests, you can use it to quickly try out the API. After obtaining your token, try pasting this string into your browser:
https://api.telegram.org/bot<YOUR_BOT_TOKEN>/getMeIn theory, you could interact with the API with basic requests like this, either via your browser or other tailor-made tools like cURL. While this can work for simple requests like the example above, it’s not practical for larger applications and doesn’t scale well.
For that reason, this guide will show you how to use libraries and frameworks, along with some basic programming skills, to build a more robust and scalable project.
If you know how to code, you’ll fly right through each step in no time — and if you’re just starting out, this guide will show you everything you need to learn.
|
Note
|
We will use Kotlin throughout this guide as it’s one of the most popular programming languages, however, you can follow along with any language as all the steps are fundamentally the same. Since JVM is fully cross-platform, each code example will work with any operating system. If you pick another language, equivalent examples are available in C#, Python, Go and TypeScript. |
Getting Ready
First, we will briefly cover how to create your first project, obtain your API token and download all necessary dependencies and libraries.
For the purposes of this guide, a similar bot from the original tutorial is also live at @TutorialBot — feel free to check it out along the way to see how your own implementation should look after each step.
Obtain Your Bot Token
In this context, a token is a string that authenticates your bot (not your account) on the bot API. Each bot has a unique token, which can also be revoked at any time via @BotFather.
Obtaining a token is as simple as contacting @BotFather, issuing the /newbot command, and following the steps until you’re given a new token.
You can find a step-by-step guide here.
Your token will look something like this:
4839574812:AAFD39kkdpWt3ywyRZergyOLMaJhac60qc|
Warning
|
Make sure to save your token in a secure place, treat it like a password, and don’t share it with anyone. |
Download an IDE
To program in Kotlin, you’ll need an IDE — a special text editor that will let you write, compile and run your code. In this tutorial, we’ll use IntelliJ IDEA — there are several free, open source alternatives like Eclipse or NetBeans which work in the exact same way.
You will also need a JDK, a software kit that allows your Kotlin code to run. Most IDEs don’t include a JDK, so you should download a version compatible with your operating system separately. You can find a free, open source version here.
|
Note
|
If you use another language, the steps are identical. You will just have to download a different IDE and software development kit. |
Pick a Framework or Library
You can think of a framework as software that handles all the low-level logic for you, including the API calls, and lets you focus on your bot-specific logic.
In this tutorial, we’ll use InsanusMokrassar/TelegramBotAPI, but you can follow along with any equivalent implementation since all the underlying methods are either similar or exactly the same.
|
Note
|
You can find many frameworks, along with code examples, in our dedicated list. |
Create Your Project
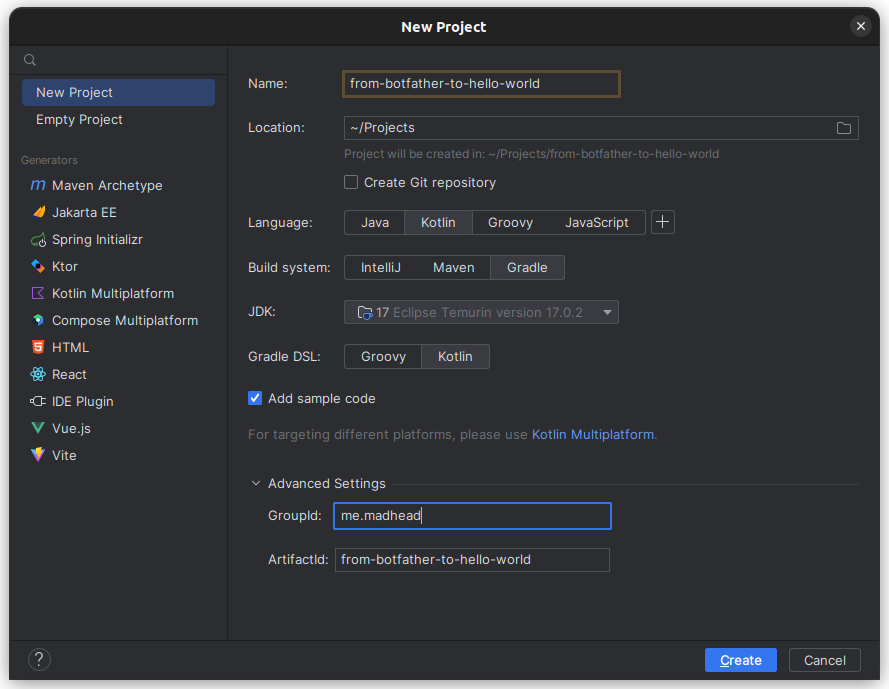
In IntelliJ, go to File > New > Project.
Fill in the fields accordingly:
-
Name — The name of your project. For example, from-botfather-to-hello-world.
-
Location — Where to store your project. You can use the default value.
-
Language — Kotlin
-
Build System — The framework that will handle your dependencies. Pick Gradle.
-
JDK — Pick whichever version you downloaded. We’ll be using version 17.
-
Gradle DSL — Select Kotlin as well.
-
Add Sample Code — Leave this selected, it will generate some needed files for you.
-
Advanced Settings > GroupId — Use your reversed domain here or tutorial for the sake of this guide.
-
Advanced Settings > ArtifactId — You can use the default value.
After hitting Create, if you did everything correctly, your Project view in the top left should show a project structure along these lines:
from-botfather-to-hello-world
├── build.gradle.kts
├── gradle
│   └── wrapper
│       ├── gradle-wrapper.jar
│       └── gradle-wrapper.properties
├── gradle.properties
├── gradlew
├── gradlew.bat
├── settings.gradle.kts
└── src
    ├── main
    │   ├── kotlin
    │   │   └── Main.kt
    │   └── resources
    └── test
        ├── kotlin
└── resources|
Note
|
Other IDEs will follow a similar pattern. Your dependency management system will have a different name (or no name at all if it’s built-in) depending on the language you chose. |
If this looks scary, don’t worry.
We will only be using the Main.kt file and the build.gradle.kts file.
In fact, to check that everything is working so far, double-click on Main and click on the small green arrow on the left of fun main, then select the first option (Run 'MainKt').
If you followed the steps correctly, Hello World! should appear in the console below.
Add Framework Dependency
We will now instruct the IDE to download and configure everything needed to work with the API. This is very easy and happens automatically behind the scenes.
First, locate your build.gradle.kts file on the left side of the screen.
Open it by double-clicking and simply add the library to the dependencies section:
dependencies {
    implementation("dev.inmo:tgbotapi:3.2.7")
}
When you’re done, your build.gradle.kts should look something like this.
Start Coding
We are ready to start coding. If you’re a beginner, consider that being familiar with your language of choice will greatly help. With this tutorial, you’ll be able to teach your bot basic behaviors, though more advanced features will require some coding experience.
Creating a Bot
There are two mutually exclusive ways of receiving updates in your bot: either by polling for them or by receiving them via a webhook.
Polling essentially means asking for the updates in an endless loop, i.e. you pull the updates from Telegram servers. With webhooks, updates are pushed into your bot by Telegram via HTTPS.
You decide which way suits you best, and the library provides you several methods to create bots depending on your choice.
We’ll start with the telegramBotWithBehaviourAndLongPolling:
suspend fun main(args: Array<String>) {                            // <1>
    val token = args[0]                                            // <2>
    val (_, job) = telegramBotWithBehaviourAndLongPolling(token) { // <3>
        this
            .allUpdatesFlow                                        // <4>
            .onEach { println(it) }                                // <5>
            .launchIn(GlobalScope)                                 // <6>
    }

    job.join()                                                     // <7>
}.-
Add a
suspendmodifier to yourmainfunction, as the library makes heavy use of coroutines. -
It’s better to pass the token as an argument for your program than hard-coding it.
-
telegramBotWithBehaviourAndLongPollingreturns a pair of values: the bot itself and aJob. We’re not very interested in thebotvalue, so we do not assign it to any variable, that’s what_means. We’ll use this job later, read below. -
allUpdatesFlowis aFlow, i.e. a lazy, potentially endless sequence ofUpdates. Flows are used to listen to or transform the values that flow through them. -
Here we just listen for the values and print them.
-
This listening process should occur in a
CoroutineScope. For this simple example, we’ll use aGlobalScope. -
Remember the job that we get at step #3? Here we wait for its completion. And this job would never actually complete on its own because the number of updates your bot potentially receives is unbound.
You might be confused by all these coroutines, jobs, scopes, flows, and, especially, by the waiting for the completion of an endless loop — it sounds like nonsense! But those are the very basic concepts and patterns of Kotlin Coroutines. After finishing this tutorial you might want to read more about them.
First Run
It’s time to run your bot for the first time.
Hit the green arrow to the left of fun main and select the first option (Run 'MainKt').
And then there was nothing. Yes, a bit anticlimactic. This is because your bot has nothing to print – there are no new updates because nobody messaged it yet.
If you try messaging the bot on Telegram, you’ll then see new updates pop up in the console. At this point, you have your very own Telegram Bot – quite the achievement. Now, on to making it a bit more intelligent.
|
Tip
|
If nothing pops up, make sure you messaged the right bot and that the token you pasted in the code is correct. |
Receiving Messages
Every time someone sends a private message to your bot, the onContentMessage callback will be called, and you’ll be able to handle the update (named it, if you don’t override the name of the parameter), which contains the message, along with a great deal of other info which you can see detailed here.
Let’s focus on two values for now:
-
The user — Who sent the message. Access it via
it.from. -
The message — What was sent. Access it via
it.text.
Knowing this, we can make it a bit more clear in the console output.
-this.allUpdatesFlow.onEach { println(it) }.launchIn(GlobalScope)

+onContentMessage {
+    val user = it.from
+    println("${user?.firstName ?: "Unknown user"} wrote ${it.text}")
+}
This is just a basic example – you can now play around with all the methods to see everything you can pull out of these objects.
You can try it.from.firstName, it.chat, and dozens more.
Knowing how to receive, process, and print incoming messages, now it’s time to learn how to answer them.
|
Tip
|
Remember to stop and re-launch your bot after each change to the code. |
Sending Messages
To send a private text message, you generally need three things:
-
The user must have contacted your bot first. (Unless the user sent a join request to a group where your bot is an admin, but that’s a more advanced scenario).
-
You must have previously saved the User ID (
it.from.id) -
A
Stringobject containing the message text, 1–4096 characters.
With that out of the way, let’s send the first message:
suspend fun main(args: Array<String>) {
    val token = args[0]
    val bot = telegramBot(token)                                   // <1>

    bot.sendTextMessage(ChatId(1234), "Hello, World!")             // <2>
}-
As long as we don’t build a complex behavior for the bot here, a simple
telegramBotis enough for this example. -
For this example, we’ll assume your ID is
1234. You could get your real ID from the updates received in the previous steps, or by contacting @myidbot
If you did everything correctly, your bot should text you Hello World! every time you launch your code.
Sending messages to groups or channels – assuming you have the relevant permissions – is as simple as replacing 1234 with the ID of the respective chat.
|
Tip
|
Try experimenting with other types of messages, like |
Echo Bot
Let’s practice everything we tried so far by coding an Echo Bot. Its functionality will be rather simple: every text message it receives will be sent right back to the user.
Copying Text
The most intuitive way of coding this is just replying to any message… with itself.
In other words:
suspend fun main(args: Array<String>) {
    val token = args[0]
    val bot = telegramBot(token)

    bot.buildBehaviourWithLongPolling {                            // <1>
        onContentMessage {                                         // <2>
            bot.reply(it, it)                                      // <3>
        }
    }.join()
}-
Here we’ll explore just another way to set up long polling and bot behavior:
buildBehaviourWithLongPolling. -
onContentMessagewill be called for every message with content, e.g. text, stickers, and pictures. There are messages with no content as well, like join requests. -
The
replysimply replies to a message.
|
Note
|
This tutorial assumes that updates always contain messages for the sake of simplicity. This may not always be true – be sure to implement all the proper checks in your code to handle every type of update with the appropriate methods. |
Executing Commands
To learn what a command is and how it works, we recommend reading this dedicated summary. In this guide, we’ll focus on the technical side of things.
Creating Your Command
Begin by opening @BotFather.
Type /mybots > Your_Bot_Name > Edit Bot > Edit Commands.
Now send a new command, followed by a brief description. For the purpose of this tutorial, we’ll implement two simple commands:
scream — Speak, I'll scream right back
whisper — Shhhhhhh
Command Logic
We want the Echo Bot to reply in uppercase when it’s in scream mode and normally otherwise.
First, let’s create a variable to store the current mode.
suspend fun main(args: Array<String>) {
    val token = args[0]
    val bot = telegramBot(token)
+   var screaming = false

    …
}
Then, let’s change some logic to switch the mode.
bot.buildBehaviourWithLongPolling {
    …

+   onCommand("scream") {
+       screaming = true
+   }
+   onCommand("whisper") {
+       screaming = false
+   }

    …
}.join()
The onCommand is called whenever the bot receives a command that is passed as a parameter to the onCommand.
Next, let’s add an extension for the CommonMessage to check if it contains any commands.
We’ll use this extension as a filter in the next step.
fun CommonMessage<*>.hasCommands(): Boolean =
    (this.content as? TextContent)?.textSources?.any { it.botCommandTextSourceOrNull() != null } ?: false

fun CommonMessage<*>.hasNoCommands(): Boolean = !this.hasCommands()
Probably when you’re reading these lines, these extensions are already included in the library.
Finally, let’s tune our onContentMessage to support the modality.
onContentMessage(
    initialFilter = CommonMessage<MessageContent>::hasNoCommands
) {
    val text = it.text

    if (text != null) {
        bot.reply(it, if (screaming) text.uppercase() else text)
    } else {
        bot.reply(it, it)
    }
}
As you can see, it checks if the message is a text. If it is, the bot additionally checks if it is in a screaming mode before it replies.
And that’s it. Now the bot can execute commands and change its behavior accordingly.
Naturally, this simplified logic will change the bot’s behavior for everyone – not just the person who sent the command. This can be fun for this tutorial but won’t work in a production environment – consider using a Map, dictionary, or equivalent data structure to assign settings for individual users.
|
Tip
|
Remember to always implement a few basic global commands.
You can practice by implementing simple feedback to the |
Buttons and Keyboards
To streamline and simplify user interaction with your bot, you can replace many text-based exchanges with handy buttons. These buttons can perform a wide variety of actions and can be customized for each user.
Button Types
There are two main types of buttons:
-
Reply Buttons — are used to provide a list of predefined text reply options.
-
Inline Buttons — are used to offer quick navigation, shortcuts, URLs, games and so much more.
Using these buttons is as easy as attaching a ReplyKeyboardMarkup or an InlineKeyboardMarkup to your message.
This guide will focus on inline buttons since they only require a few extra lines of code.
Creating Buttons
First of all, let’s create some buttons.
val next = CallbackDataInlineKeyboardButton(text = "Next", callbackData = "next")
val back = CallbackDataInlineKeyboardButton(text = "Back", callbackData = "back")
val url = URLInlineKeyboardButton(text = "Tutorial", url = "https://madhead.me/posts/from-botfather-to-hello-world")
Let’s go back through the fields we specified:
-
Text — This is what the user will see, the text that appears on the button
-
Callback Data — This will be sent back to the code instance as part of a new
CallbackQueryUpdate, so we can quickly identify what button was clicked. -
Url — A button that specifies a URL doesn’t specify callbackdata since its behavior is predefined – it will open the given link when tapped.
Creating Keyboards
The buttons we created can be assembled into two keyboards, which will then be used to navigate back and forth between two sample menus.
val firstMenuMarkup = flatInlineKeyboard { next }
val secondMenuMarkup = inlineKeyboard {
    row { back }
    row { url }
}|
Tip
|
You can place this code wherever you prefer, the important thing is to make sure that keyboard variables are accessible from the method call that will send the new menu. If you’re confused by this concept and don’t know where to put them, just paste them above the command processing flow. Or just look at the final code here. |
Sending Keyboards
Sending a keyboard only requires specifying a reply markup for the message.
bot.sendMessage(
    chat = someChat,
    text = someText,
    replyMarkup = someReplyMarkup
)
Menu Trigger
We could send a new menu for each new user, but for simplicity let’s add a new command that will spawn a menu.
We can achieve this by adding a new onCommand("menu") clause to the previous behavior block.
onCommand("menu") {
    bot.sendMessage(
        chat = it.chat,
        text = "<b>Menu 1</b>",
        parseMode = HTMLParseMode,
        replyMarkup = firstMenuMarkup
    )
}|
Tip
|
You may have noticed that we also added a new parameter, |
Try sending /menu to your bot now.
If you did everything correctly, you should see a brand new menu pop up.
|
Note
|
In a production environment, commands should be handled with an appropriate design pattern that isolates them into different executor classes – modular and separated from the main logic. |
Navigation
When building complex bots, navigation is essential. Your users must be able to move seamlessly from one menu to the next.
In this example, we want the Next button to lead the user to the second menu.
The Back button will send us back.
To do that, we will start processing incoming MessageDataCallbackQueries, which are the results we get after the user taps on a button.
A MessageDataCallbackQuery is essentially composed of three main parameters:
-
id — Needed to close the query. You must always close new queries after processing them – if you don’t, a loading symbol will keep showing on the user’s side on top of each button.
-
from — The user who pressed the button.
-
data — This identifies which button was pressed.
Processing in this context just means executing the action uniquely identified by the button, then closing the query.
A very basic button handler could look something like this:
bot.buildBehaviourWithLongPolling() {
    onMessageDataCallbackQuery("next") {
        bot.edit(
            chatId = it.message.chat.id,
            messageId = it.message.messageId,
            text = secondMenu,
            parseMode = HTMLParseMode,
            replyMarkup = secondMenuMarkup,
        )
    }

    onMessageDataCallbackQuery("back") {
        bot.edit(
            message = it.message as ContentMessage<TextContent>,
            text = firstMenu,
            parseMode = HTMLParseMode,
            replyMarkup = firstMenuMarkup,
        )
    }

    onDataCallbackQuery {
        bot.answerCallbackQuery(it)
    }
}.join()
With these handlers, whenever a button is tapped, your bot will automatically navigate between inline menus. Expanding on this concept allows for endless combinations of navigable submenus, settings, and dynamic pages.
Database
Telegram does not host an update database for you – once you process and consume an update, it will no longer be available. This means that features like user lists, message lists, current user inline menus, settings, etc. have to be implemented and maintained by bot developers.
If your bot needs one of these features and you want to get started on data persistence, we recommend that you look into serialization practices and libraries for your language of choice, as well as available databases.
Implementing a database is out of scope for this guide, however, several guides are available online for simple embedded open source software solutions like SQLite, HyperSQL, Derby, and many more.
|
Note
|
Your language of choice will also influence which databases are available and supported – the list above assumes you followed this Kotlin tutorial. |
Hosting
So far, your bot has been running on your local machine – your PC. While this may be good for developing, testing, and debugging, it is not ideal for a production environment. You’ll want your bot to be available and responsive at all times, but your computer might not always be online.
This can be done in four steps:
-
Package your code
Making your bot easy to move and runnable outside of an IDE is essential to host it elsewhere. If you followed this tutorial, this standard guide will work for you. If you didn’t, look into export or packaging guides for your IDE and language of choice – procedures may vary but the end result is the same.
-
Purchase a VPS or equivalent service
A server is essentially a machine that is always online and running, without you having to worry about anything. To host your bot, you can opt for a VPS which serves this purpose and can be rented from several different providers. Another option would be to purchase a network-capable microcontroller, which come in all different specs and sizes depending on your needs.
NoteYou should ensure that all user data remains heavily encrypted at all times in your database to guarantee the privacy of your users. The same concept applies to your local instance, however, this becomes especially important once you transfer your database to a remote server.
-
Upload your executable/package
Once you have a working ssh connection between your machine and your new server, you should upload your executable and all associated files. We will assume the runnable jar
TutorialBot.jarand its databasedbase.dbare currently in the/TBotfolder.$ scp -r /TBot/ username@server_ip:/bots/TBotRemote/ -
Run your application
Depending on which language you chose, you might have to configure your server environment differently. If you chose Kotlin, you just need to install a compatible JDK.
$ apt install openjdk-17-jre
$ java -version
If you did everything correctly, you should see a Java version as the output, along with a few other values. This means you’re ready to run your application.
Now, to run the executable:
$ cd /bots/TBotRemote/
$ java -jar TutorialBot.jar
Your bot is now online and users can interact with it at any time.
|
Note
|
To streamline and modularize this process, you could employ a specialized docker container or equivalent service. If you followed along in one of the equivalent examples (C#, Python, Go, and TypeScript) you can find a detailed set of instructions to export and run your code here. |
Further Reading
If you got this far, you might be interested in these additional guides and docs:
If you encounter any issues while following this guide, you can contact us on Telegram at @BotSupport.